
Signocore Toolkit shows a cookie consent banner, remembers each visitor's choice and passes it on to Google tags through Consent Mode v2. The banner is on as soon as you activate the plugin.

Set up the banner
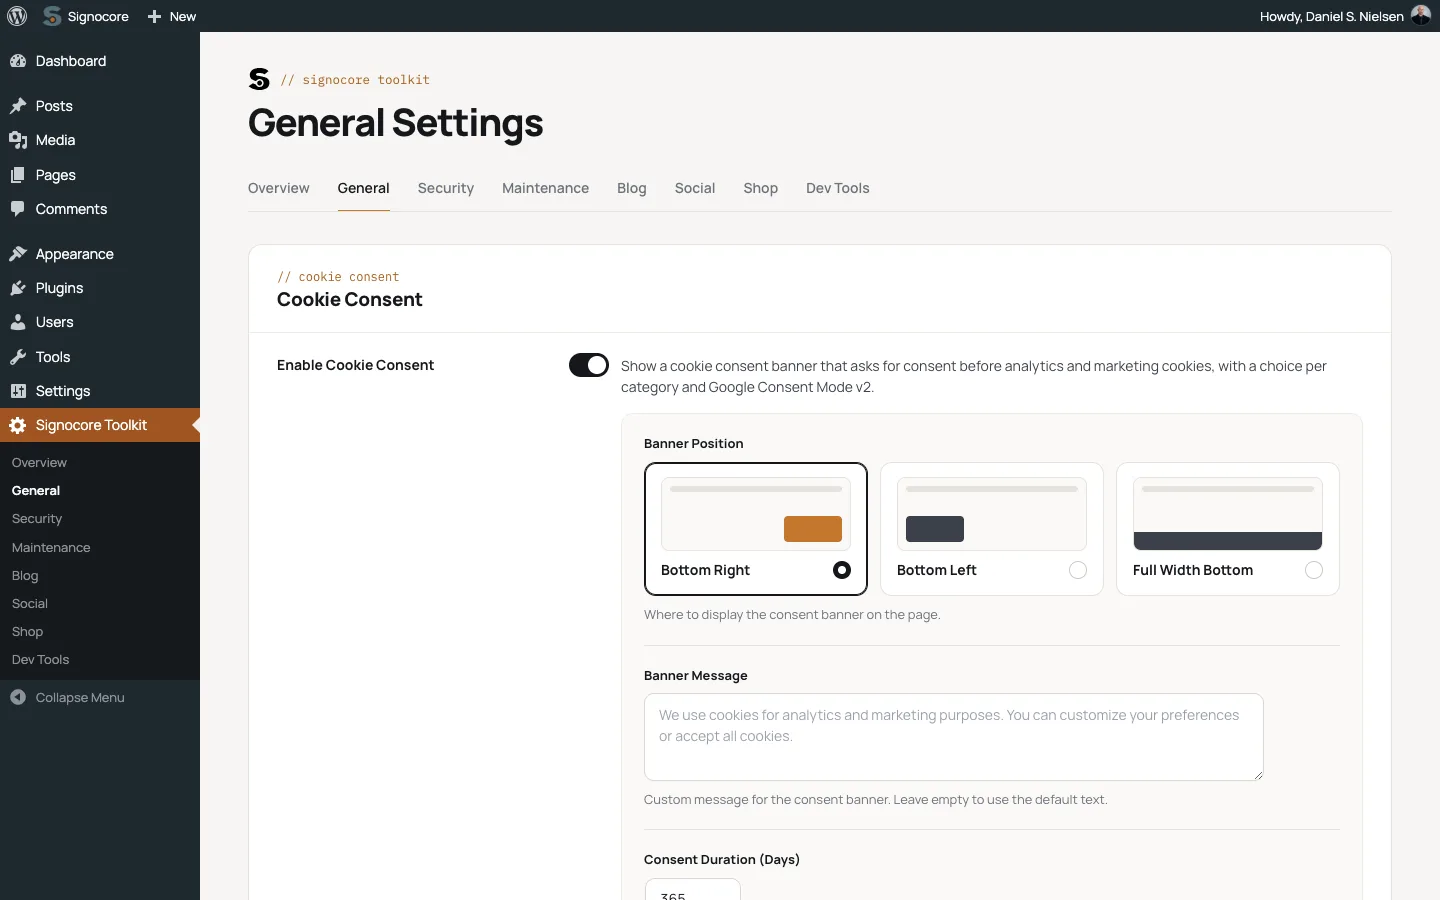
Go to Signocore Toolkit → General and find the Cookie Consent card. Change what you need and click Save Changes.
| Setting | Default | What it does |
|---|---|---|
| Enable Cookie Consent | On | Shows the banner and sends the Consent Mode defaults. Turn it off and neither is printed, and the consent script is not loaded. |
| Banner Position | Bottom Right | Bottom Right, Bottom Left or Full Width Bottom. |
| Banner Message | Empty | Your own text for the banner. Plain text only. Leave it empty to show "We use cookies for analytics and marketing purposes. You can customize your preferences or accept all cookies." |
| Consent Duration (Days) | 365 | How long a visitor's choice is remembered, from 30 to 730 days. A value outside that range is saved as the nearest limit. When it runs out, the banner shows again. A new value applies to choices made after you save. |
| Show Preferences Button | On | A floating cookie button that lets visitors reopen their preferences. It sits in the bottom left corner with Bottom Left, otherwise in the bottom right. If you turn it off, add a cookie settings link instead. |
Privacy policy link
The banner adds a Privacy Policy link after the message when your site has a privacy policy page. Choose the page under Settings → Privacy in WordPress and make sure it is published.
Texts and languages
The banner title (Cookie Consent), the buttons and the preferences window come from the plugin's translations and follow your site language. The plugin includes English and Danish. For other languages, translate the plugin's strings with a translation plugin. Developers can replace the banner markup with the signocore_toolkit_consent_banner_html filter. See Hooks and JavaScript events.
What visitors see
- On the first visit, the banner offers Accept All, Reject All and Customize.
- Customize opens the Cookie Preferences window with one switch per category. Necessary shows Always active and has no switch. The visitor clicks Save Preferences or Accept All.
- Closing the window before making a choice, with the close button, a click outside it or the Escape key, counts as Reject All.
- After a choice, the banner disappears and the floating button appears. It opens the same window, and so does a cookie settings link, so visitors can change or withdraw their consent at any time.
The choice is stored in the visitor's browser in a first-party cookie named sctk_consent, together with the time and how it was given. Because the banner decides in the browser whether to show itself, it works with page caching.
Note: The consent cookie is only saved over HTTPS. On a site without HTTPS, browsers drop it and the banner returns on every page.
Let visitors reopen their preferences
Besides the floating button, any link or button on your pages can open the Cookie Preferences window. This is how visitors change their choice when you turn off Show Preferences Button, and a footer link is a good idea either way.
- Shortcode: add
[cookie-settings]to a page, a widget or a footer block. It prints a Cookie settings link. Change the text with thetextattribute, for example[cookie-settings text="Manage cookies"]. - Menu link: add a custom link to a menu with
#sctk-cookie-settingsas its URL. - Your own markup: give any link or button the
data-sctk-open-preferencesattribute, for example<button type="button" data-sctk-open-preferences>Cookie settings</button>. Use a link or a button, so keyboard users can reach it too.
The shortcode prints nothing, and the links do nothing, while Enable Cookie Consent is off.
Consent categories
| Category | Description visitors see | Switch |
|---|---|---|
| Necessary | Required for the website to function properly. These cookies cannot be disabled. | Always active |
| Analytics | Help us understand how visitors interact with our website to improve user experience. | Off until the visitor agrees |
| Marketing | Used for advertising and personalized content based on your interests. | Off until the visitor agrees |
Add your own categories
A developer can add categories, or change the labels and descriptions of the existing ones, with the signocore_toolkit_consent_categories filter:
add_filter('signocore_toolkit_consent_categories', function (array $categories): array {
    $categories['preferences'] = [
        'label' => 'Preferences',
        'description' => 'Remember choices such as your language and region.',
        'required' => false,
    ];

    return $categories;
});
A new category gets its own row in the preferences window. Accept All grants it and Reject All denies it, unless you mark it as required. The choice is stored in the consent cookie and sent with the sctk:consent:updated event under the category's key, preferences in this example. Avoid the keys v, ts and method, which the cookie uses for itself.
Custom categories are not sent to Google. Use them to load your own scripts, as shown in Load other scripts only after consent.
Note: Visitors who made their choice before you added a category are not asked again. For them, the new category counts as not granted until they change their preferences.
How Google Consent Mode v2 works here
Defaults
On every frontend page, while the banner is enabled, the Toolkit prints this early in the page head, at wp_head priority 1:
gtag('consent', 'default', {
    'analytics_storage': 'denied',
    'ad_storage': 'denied',
    'ad_user_data': 'denied',
    'ad_personalization': 'denied',
    'functionality_storage': 'granted',
    'security_storage': 'granted'
});
The same script creates window.dataLayer and the gtag() function, so it works whether you use the Google tag or Google Tag Manager.
Updates
When a visitor makes or changes a choice, the Toolkit sends gtag('consent', 'update', ...) right away. For a returning visitor, it sends the saved choice as an update on every page, when the Toolkit's script runs at the end of the page.
| Consent Mode signal | Default | Granted when the visitor accepts |
|---|---|---|
analytics_storage |
denied | Analytics |
ad_storage |
denied | Marketing |
ad_user_data |
denied | Marketing |
ad_personalization |
denied | Marketing |
functionality_storage |
granted | Always granted |
security_storage |
granted | Always granted |
personalization_storage is not set.
Set up Google Analytics 4 or Google Tag Manager
Google tags read the consent state, but only if they load after the defaults. Add your tag inside wp_head at priority 2 or higher. Most theme options and plugins for tracking codes print it there, but check the order as described under Check the setup. A tag written into the theme's header.php above the wp_head() call loads too early.
Google Analytics 4 with the Google tag
-
Leave Enable Cookie Consent on.
-
Add the Google tag snippet from your GA4 property to the head. In a child theme's
functions.phpor a small plugin, that looks like this, with your own measurement ID:add_action('wp_head', function (): void { ?> <script async src="https://www.googletagmanager.com/gtag/js?id=G-XXXXXXXXXX"></script> <script> window.dataLayer = window.dataLayer || []; function gtag(){dataLayer.push(arguments);} gtag('js', new Date()); gtag('config', 'G-XXXXXXXXXX'); </script> <?php }, 10);
-
Do not add Consent Mode code of your own. The Toolkit sends the defaults and the updates.
Google Tag Manager
- Add the Tag Manager container snippet to the head in the same way, at priority 2 or higher.
- Google tags in the container, such as the Google tag, GA4 events and Google Ads, adjust to the consent state on their own.
- For other tags, open the tag in Tag Manager, go to Advanced Settings → Consent Settings, choose Require additional consent for tag to fire and add
analytics_storagefor analytics tags orad_storagefor marketing tags. The tag is then held back while that consent is denied. - Do not add a consent template or a second set of defaults in the container.
Check the setup
- Open a page in a private browser window and view its source. The
gtag('consent', 'default', ...)line must come before your Google tag or Tag Manager snippet. - Use Tag Assistant to connect to your site. Its consent view shows the denied defaults, then the update after you click Accept All or Reject All.
Load other scripts only after consent
Scripts that do not read Consent Mode, such as advertising pixels, chat widgets and embedded players, load as soon as they are on the page. Load them with a small script of your own, in the head or the footer, that checks the consent cookie on page load and listens for the sctk:consent:updated event, which fires on window when a visitor saves a choice. The event's detail holds the saved choice, with one true or false value per category.
(function () {
    var loaded = false;

    function loadPixel() {
        if (loaded) {
            return;
        }
        loaded = true;

        var script = document.createElement('script');
        script.src = 'https://example.com/pixel.js';
        script.async = true;
        document.head.appendChild(script);
    }

    // A returning visitor: the event does not fire again, so read the cookie.
    var match = document.cookie.match(/(?:^|; )sctk_consent=([^;]*)/);
    if (match) {
        try {
            if (JSON.parse(decodeURIComponent(match[1])).marketing) {
                loadPixel();
            }
        } catch (error) {}
    }

    // A choice made on this page.
    window.addEventListener('sctk:consent:updated', function (event) {
        if (event.detail.marketing) {
            loadPixel();
        }
    });
})();
Replace marketing with analytics or the key of a custom category as needed. The Toolkit also fires events when the banner is shown and when the preferences window opens or closes. All events and their data are listed under Hooks and JavaScript events.
Note: When a visitor withdraws consent, a script that has already loaded keeps running until the next page view, and the Toolkit does not delete cookies that other scripts have set.
What the plugin does not do
- It does not block scripts, iframes or embeds by itself. Anything on the page that ignores Consent Mode loads as usual until you gate it as shown above.
- It does not scan your site for cookies or build a cookie list for your policy.
- It does not keep a record of consent on the server. The only record is the visitor's cookie.
- It does not connect to the WP Consent API, so plugins that wait for consent through that API do not see the visitor's choice.
- It shows the same banner to every visitor, wherever they are.
A note on GDPR
The banner follows common consent principles: nothing optional is granted before the visitor chooses, Accept All and Reject All sit side by side, consent is given per category, and the floating button or a cookie settings link keeps withdrawal as easy as giving consent. Whether your site complies still depends on what it loads and how you describe it. List the cookies your site uses, including sctk_consent, in your privacy or cookie policy, and ask a legal advisor if you are unsure what your site needs.